
Keep Forma Open,
Make Forma Yours
Play your part in the exciting adventure
of creating Forma 5


Modern and responsive layout and designed for an easy and engaging user experience
Manage multiple clients and brands with custom layouts from a single platform
Easily create advanced custom reports
Add and customize features to make it perfect for your needs
Forma LMS is an open source Learning Management System, built around the specific needs of corporate training. With Forma You can provide internal training to your employees, build an extended enterprise Lms (by providing training to your employees and your partners, dealers and sellers, each one with their specific courses, look and feel) or use Forma as a content hub with which you can sell your off-the -shelf courses to your customers.
The project is carried out by the forma.association, with over 50 members and 4.000 community users, which are constantly adding new features and making the software more complete and secure.
Tutorials, guides and how-tos!
To create a new course on the platform it is first of all important to know that the procedure is divided into two main parts:
In this article we will describe the procedure of "creating the course structure" step by step.
We refer to a further tutorial for the description of the second procedure.
Let's take as an example the creation of an "Excel" course
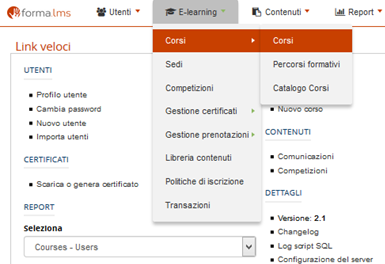
Go to Administration / E-learning / Courses / Courses
If you want to insert the "Excel" course within a category (for example inside a previously created "Office" category), you will need to click on the name of the "Office" category and then click on the "New" button

If, on the other hand, you simply want to create a new course without inserting it into any category, just click on the "New" button without first highlighting any category.
Now the time has come to configure the course by entering general data, such as title, period of use, etc.
In the first part of the screen you can enter the course code, the name of the course, the type and status.
Assigning a code to the course can be useful to identify the course faster especially if there are a large number of them on the platform.
In our example, we will simply attribute the code: 01
By setting the status "Confirmed" or "Available", the course will be visible to users while setting the remaining states, canceled, concluded, under construction, the course will not be visible to users.
In our example, we will leave the course in "Under construction" mode and, only after completing the whole procedure, we will change it to "Available"

In the central part of the screen, there are several sections related to the course. The sections of interest are first of all " Enrollment to the course " in which it is possible to set the enrollment methods:
Admin only option : This option is chosen when you want to register for the course only by the platform administrator. A user entering the platform will not be able to independently enroll to the course. In our example, we will choose this option and only the administrator will be able to enroll users in the course. (Regarding the enrollment of users to courses, we refer to the tutorial "How to enroll a user to the course")
On approval option : This option is chosen in case you want to give the user the opportunity to enter the platform and request registration for the course but it will only be actually registered once the admin has approved the registration.
Free: Choose this option if you want the user to enter the platform and be able to independently enroll to the course.
It is also possible to set the opening or closing of the registrations or to set a period in which the user can register.
For example, if we want a course to start on 01 February 2020 but we want users to be able to enroll in the previous month, we would enter:
in the "From" field: 1 January 2020 in the "To" field 31 January 2020
In this way, the user can register for the course in January and start enjoying it in February. (In the configuration of the course that we are using as an example, the Excel course, setting the dates of "enrollment possibility" would not make any sense because, as we previously wrote, we have set the enrollment mode "Only admin" therefore the user does not will never be able to independently enroll in the course, even indicating a period of time).
The same subscription options can be set for unsubscribing / unsubscribing.

If you want your course to be sold on your LMS, you should flag the "sell course" checkbox and put a price on it.
You should also enable the catalog, because it's where your course will be on sale.
Another section of interest is "Display mode" where you can decide how the course will be viewed on the platform: for example by anyone accessing the platform or only by users who are enrolled in the course.
Or, you can decide whether or not the learner will be able to view the progress of use and the time spent in the course.
Finally, you can choose which levels are viewable in the course information or to whom to block access to the course
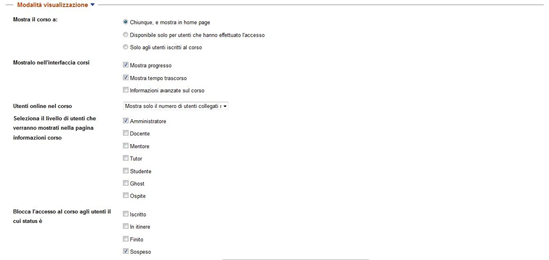
Important: users will only be able to self-enroll to a course if you have enabled the course catalog: only there they will see the "subscribe" button, the one they need to self-enroll.
The "display" option manages the visibility of your course in the general catalog: if you want to create but you don't want it to be visible in the general catalog, set it to be only visible to subscribed users.
The “Time options” section allows you to set the start date and the end date of the course. So, following our example, in case you want the course to start on February 1 and end on June 30, we should enter the date 01-02-2014 in the "Start date" field and in the "Completion date" field the date 30-06-2014

Another section of major interest is "Upload documents" (Fig.7) where you can insert the banner of a possible sponsor, the logo of the course and the demonstration material.

The optimal logo size should be 400 x 140 pixels
Finally, the last section to pay attention to is the custom option where you will see the custom fields that you have associated with the courses. See the tutorial "Custom fields"

Once you have entered the data, remember to click on the "Save changes" button
Once the course has been created, you will be automatically enrolled as Administrators. If you want to act on a course that you have not created, you must first proceed to the second phase, then insert the learning material, enroll in the course just created as administrators.
Go to Administration / E-learning / Courses / Courses and click on the enrollment icon

In the "Subscribe" search field, set your surname or userid and click on "plus"
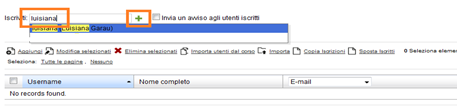
At this point, it is necessary to change the level from student to administrator

We just have to renew the invitation to pay attention to the other tutorial in which we will describe the procedure that allows the loading of materials in the course.
It is very likely that within a company, those who hold a certain role must have certain skills obtained upon the completion of certain courses. For example: the HR Manager in fulfilling his / her role must have certain skills, such as Leadership, Group Management, Personnel Selection.
To obtain these skills you will have to complete certain courses. Let's see how to activate in the platform the procedure that allows the user to be automatically assigned the skills upon completion of certain courses.
In this first example, we will then see how to assign the skills related to a role.
In the Administration section, Go to Main / Users / Skills
First of all, I create the skills that a certain role must possess, in this example I created the skills of personnel selection, leadership and group management that whoever holds the role of HR Manager must have. (Img. 1)

Img. 1
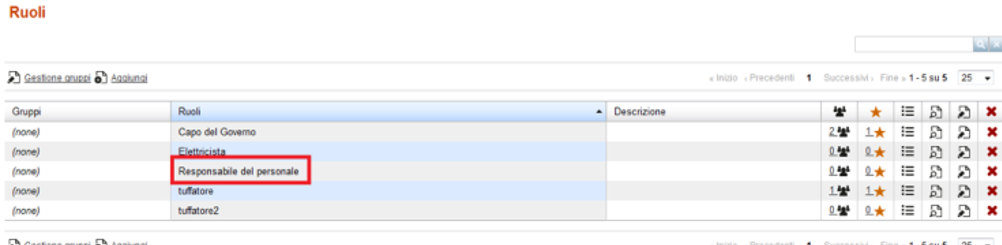
Go to Main / Users / Roles
Create the role of HR Manager (Img. 2)
Img. 2
I click on the star icon and I assign to the role of HR Manager the skills he should have to fill that particular role. Then I save the changes. (Img. 3)
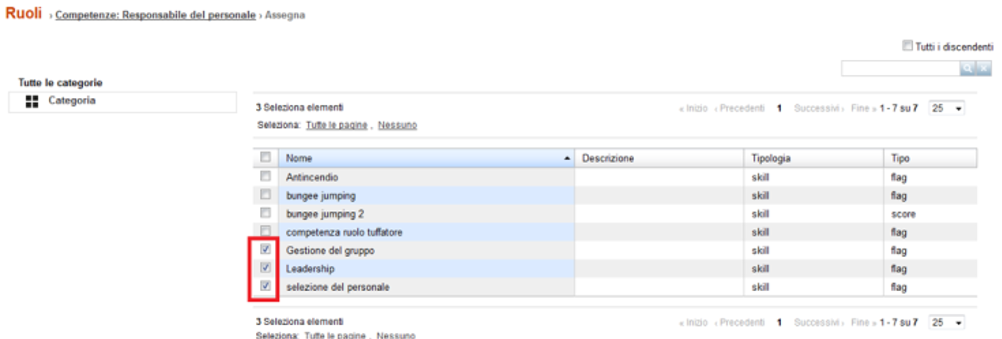
Img. 3
For each competence assigned, I can choose the expiration date (so for example every time that the competence expires the HR Manager will have to do a refresher course to maintain competence) Click on "Properties". (Img.4)
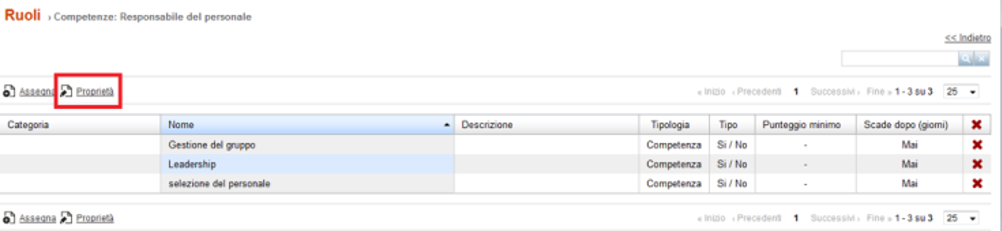
Img. 4
I choose the expiration date for each skill. (Img. 5)

Img. 5
Go to Elearning / Elearning / course
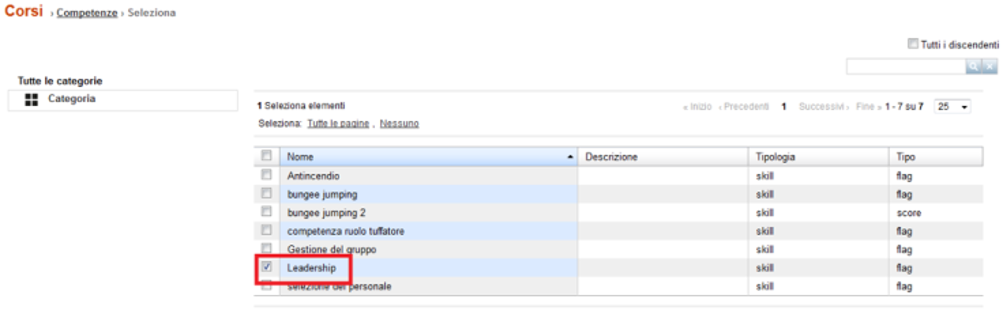
Click on the star icon for the courses whose completion allows you to obtain a specific competence. Example: Completing the course "Being a leader" will allow you to obtain the leadership competence. (Img. 6)

Img. 6
Once you click on the star, you need to assign the competence that you acquire when completing the course and save the changes. (Img. 7)
Img. 7
The same procedure will be followed for courses related to all skills that a certain role must have. Following our example, we will need to assign:
At this point, the user who has been assigned the role of HR Manager, must complete the 3 courses to receive the related skills.
Regarding the update of competences:
In the company, it is also likely that the assignment of skills to a specific role does not necessarily have to be linked, but simply it may be necessary that upon completion of a specific course (or more courses) a user receives certain skills.
Go to Main / Users / Skills
I create the skills that the user will get after completing a certain course. For example, we want a user who completes the "Accident" course to obtain the "Accident" skill (Img. 8)

Fig. 8
Go to Elearning / Elearning / course
Click on the star icon for the course whose completion allows you to obtain a specific skill. Following our example: Completing the "Accident" course will allow you to obtain the "Accident" competence.
NOTES: Using the simple assignment of a competence to a course without using roles, it is NOT POSSIBLE to set the expiration date of the competences !!! So, for example, we cannot set when a user will have to take a course on accident prevention to update the relative competence.
After seeing how to create and configure the verification test , let's move on to the detailed description of the loading and configuration of the FAQ within a course.
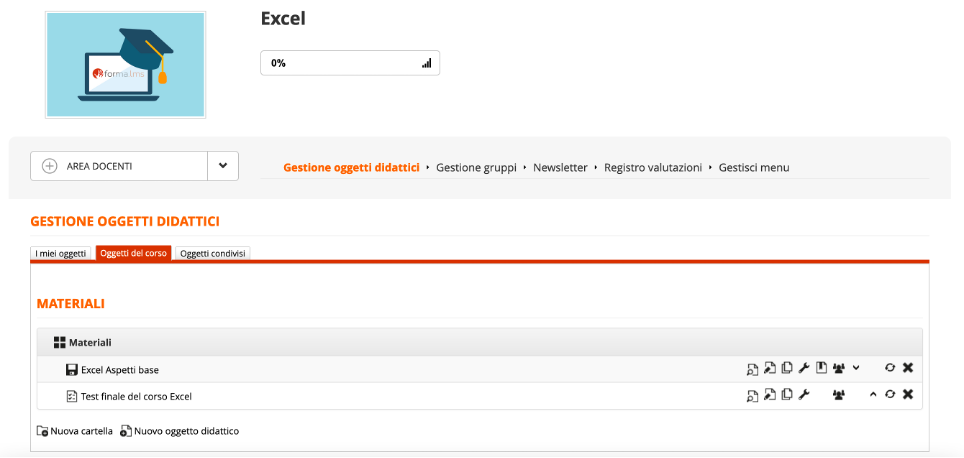
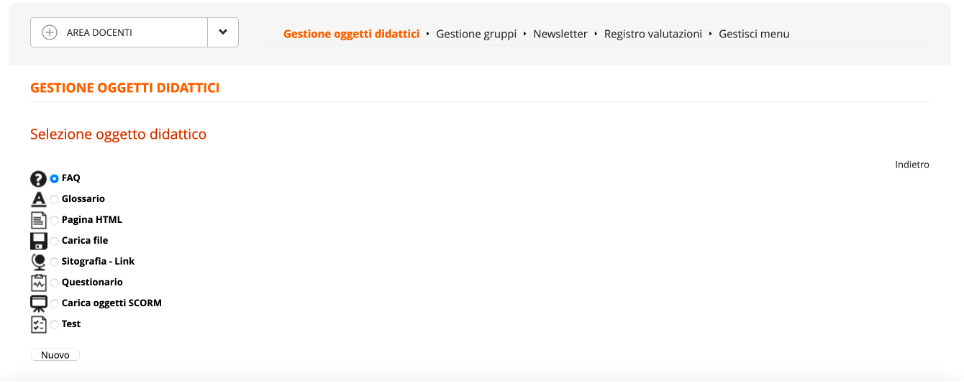
Go to Front end, click on "My courses" and click on the course title. For example, we will click on the title of the course "Excel"
To configure the material, click on the menu item "Teachers Area / Teaching Objects Management / Course Objects"
In the right part of the screen, there are all the icons that allow the different configurations.
Edit icon
By clicking on the "edit" icon it is possible to set most of the configurations of the learning object.
We remind you that to insert the FAQ within the course, it is necessary to click on the menu item "Teachers Area / Learning Objects Management / Course Objects" and click on "New Learning Object" and check the FAQ
To insert or modify the FAQ, click on the "Modify" icon relating to the FAQ.
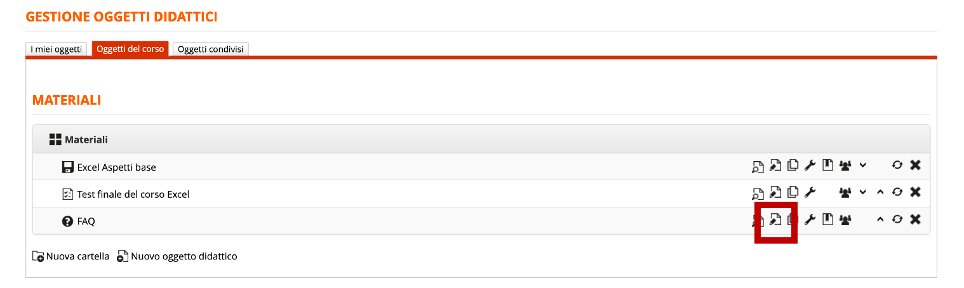
In the screen that we display, we can proceed with the modification of the title, the insertion of new FAQs and the modification of those previously created.
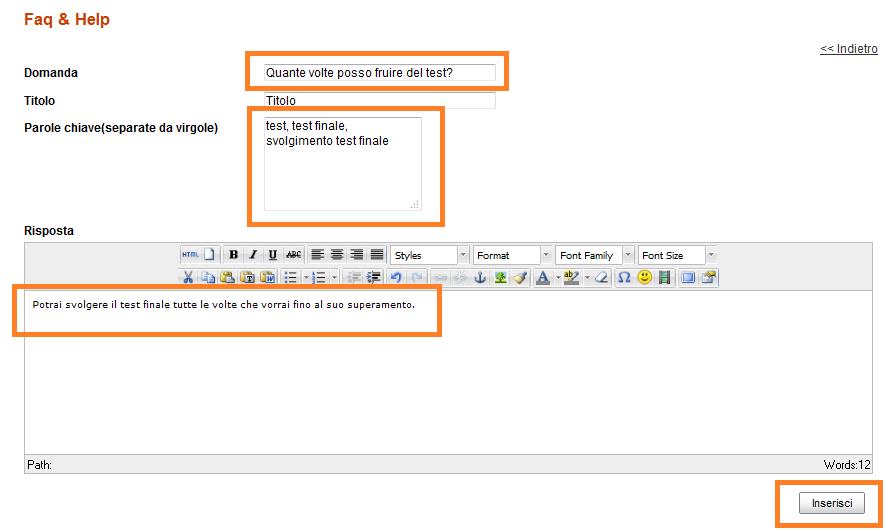
Now let's see how to insert a new FAQ. Click on the "Add a faq" button.
In the screen that we display, we must enter the text of the question, the answer and the keywords that allow a quick search of this specific question.
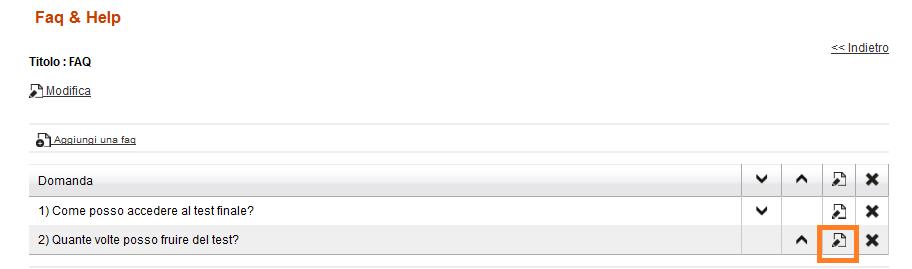
Now let's see how to edit an existing FAQ. We therefore click on the edit icon relating to the FAQ that we want to edit.
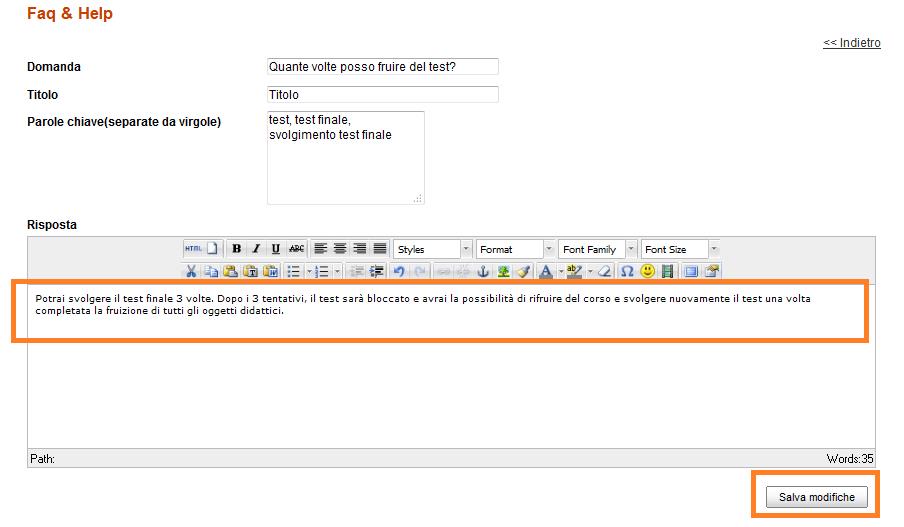
Let's take the case, that we decide to change the test procedure and therefore we want that only 3 attempts can be made. If the learner fails to pass the test, the latter will be blocked and before having the possibility to carry it out for the fourth time, he will have to take advantage of the educational objects that precede it. At this point, in addition to changing the configuration of how the test is used, we should also change the answer of the FAQ. Simply delete the answer previously entered and write the correct one. Remember to click on the button.
To view the description of the remaining icons, please view the other tutorial on How to configure the learning materials .
The FAQ are now configured, we refer to further tutorials for the configuration of the glossary and the description of many other useful procedures.
Below we will describe in detail how to configure tests in Forma LMS.
Go to Front end, click on "My courses" and click on the course title. For example, we will click on the title of the course "Excel"
To configure the materials, click on the menu item "Teachers Area / Learning Objects Management / Course Objects"

In the right part of the screen, there are all the icons that allow the different configurations.

Edit icon
By clicking on the "edit" icon you can set up most of the configurations of our test.
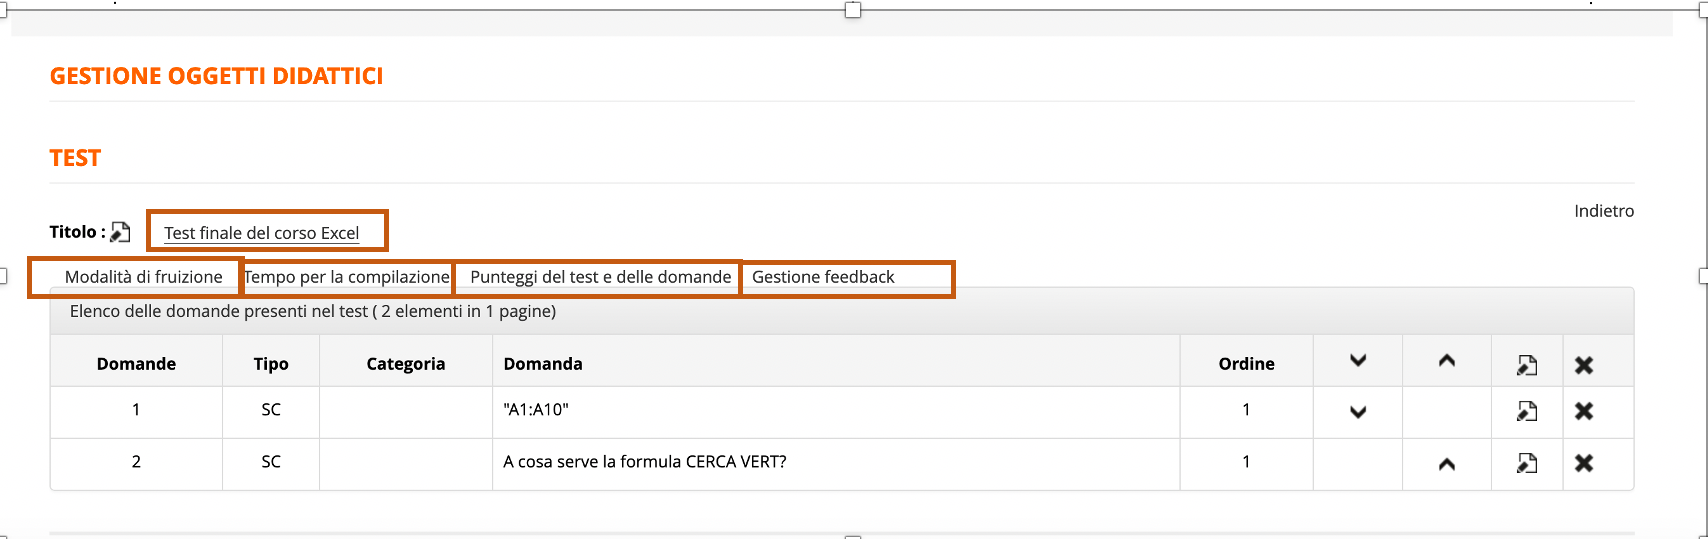
Let's start by seeing how we can set up a verification test. Following our example, we click on the "Edit" icon for "Final test of the Excel course". In the screen that we display, we have the possibility to click on different tabs, each of which will allow us to make changes to the test.
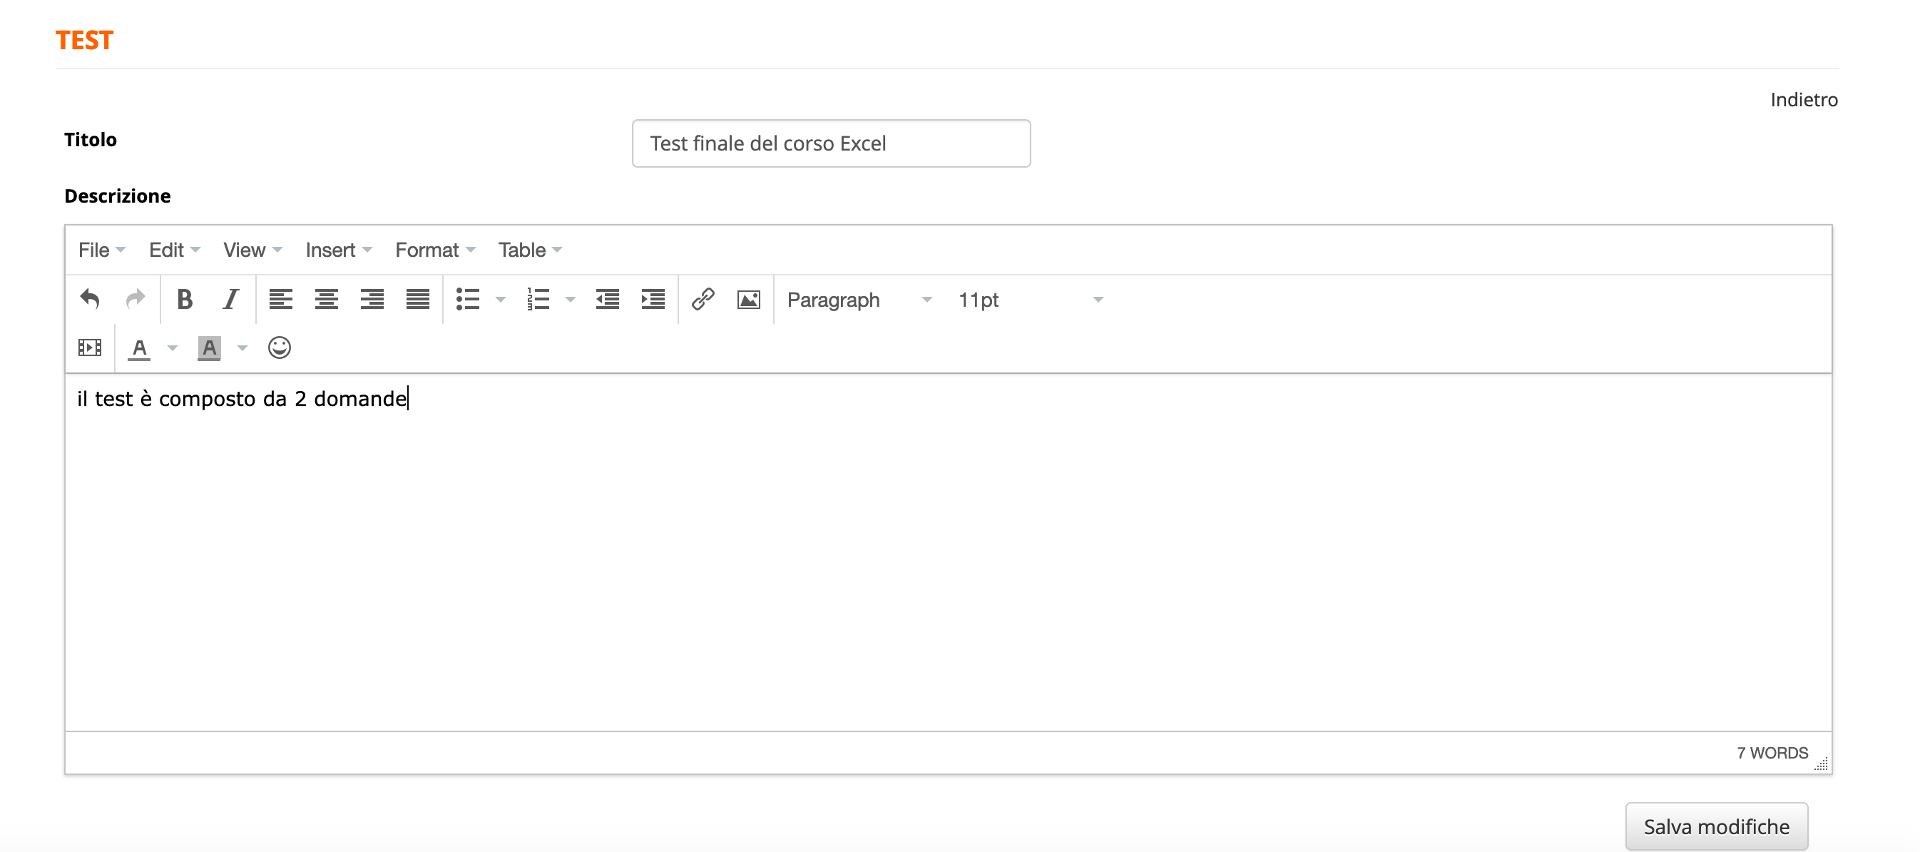
Clicking on "Title" displays a screen that allows us to change the title and description of our test. After making the changes, click on the "Save changes" button.
Please note that the system, if you don't expressly "hide" the information, will automatically include the default information in the description. So the user will be displayed all the test options (nr. of questions, minimum and maximum score, etc.).
By clicking on the "Test options" tab you can set some of the main configurations related to the test. For example:
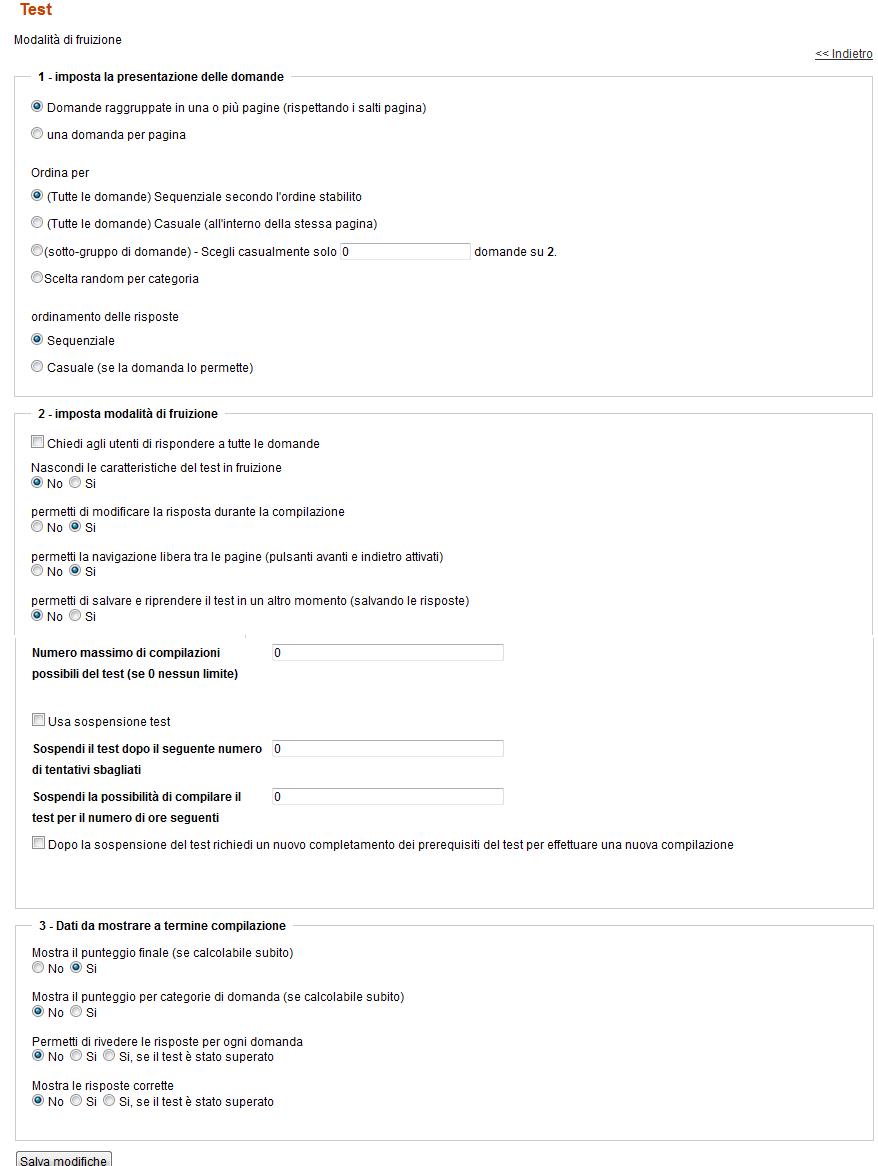
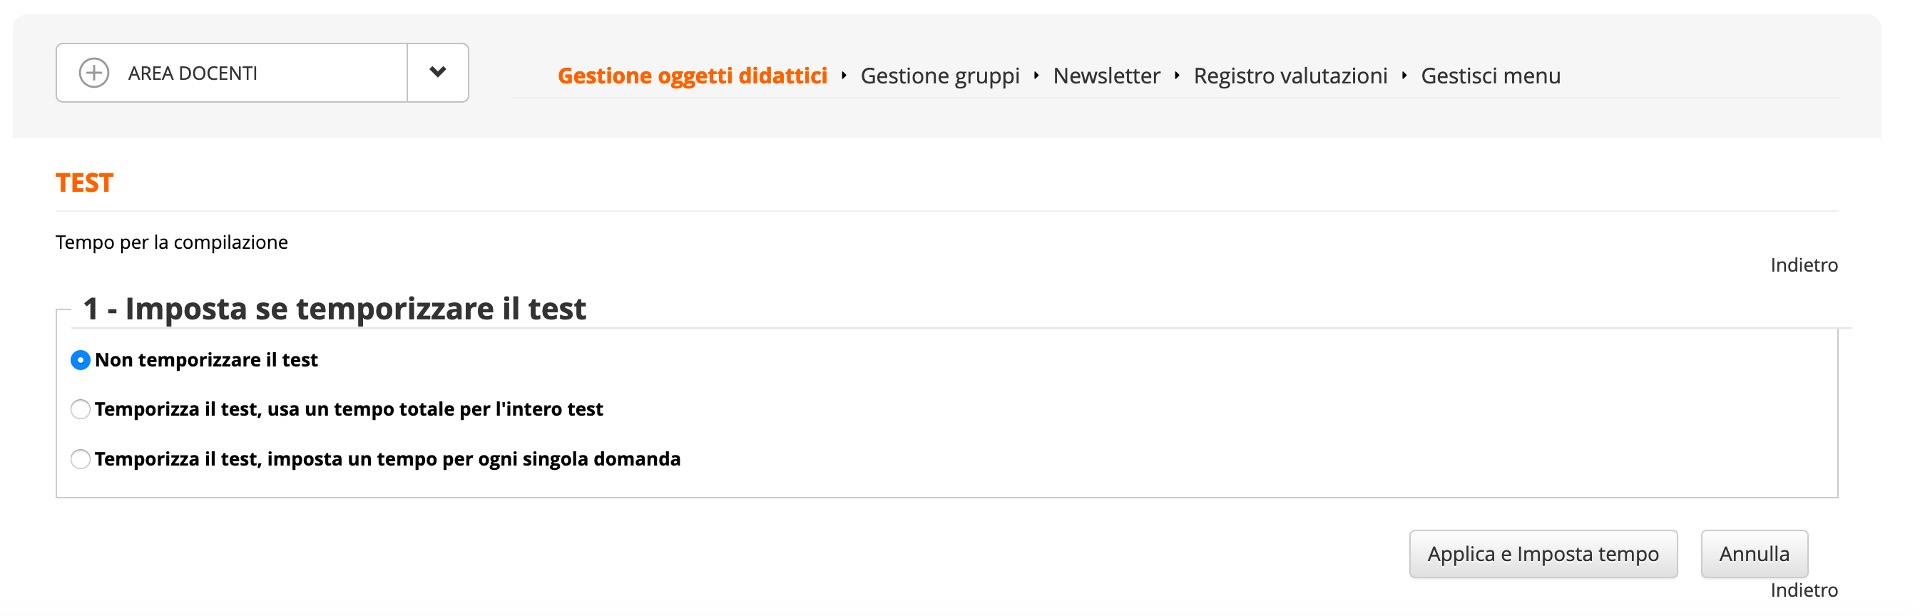
By clicking on the tab "Time to complete the test" it is possible to choose whether to assign a time limit for the whole test or for single questions.
By clicking on the tab "Test and question scores" it is possible to assign, both in percentages and in points, how many correct answers the user must provide in order to consider the test passed. In our example, we set that the user must provide 70% of correct answers to pass the test
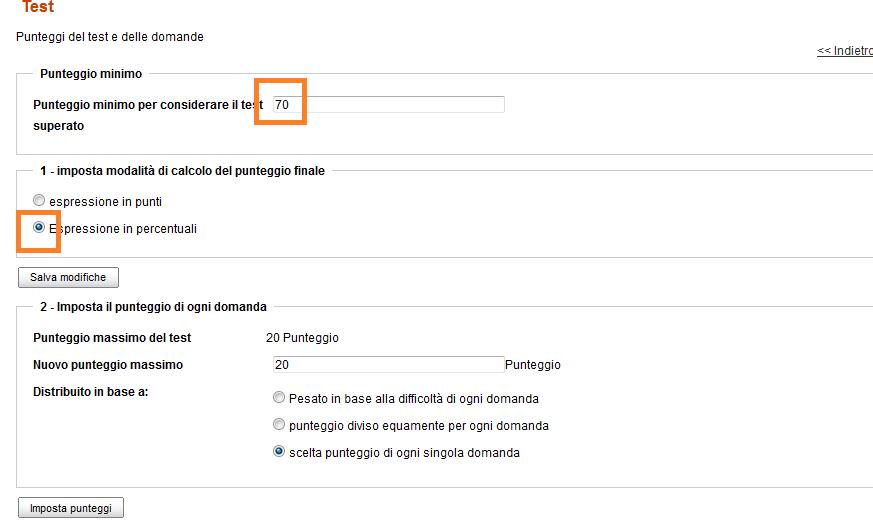
After setting a pass mark (in % or in absolute numbers) save. You'll be taken back to the test editing. To set the MAXIMUM number you are supposed to click once again on Scores management. You have three choices:
To sum this topic up: you can start by the Pass Mark or by the Maximum score. Regardless, you need to set your scores in two separate steps and save each step.
You can also assign the scores on every indididual answer, but it's more practical to do it in bulk. The only advantage you have if you assign scores on an individual basis is that with that option you can also assign negative scores and comments for the wrong answers.
By clicking on the "Feedback management" tab, you can add feedback that the user will see when the test is completed

"Properties" icon
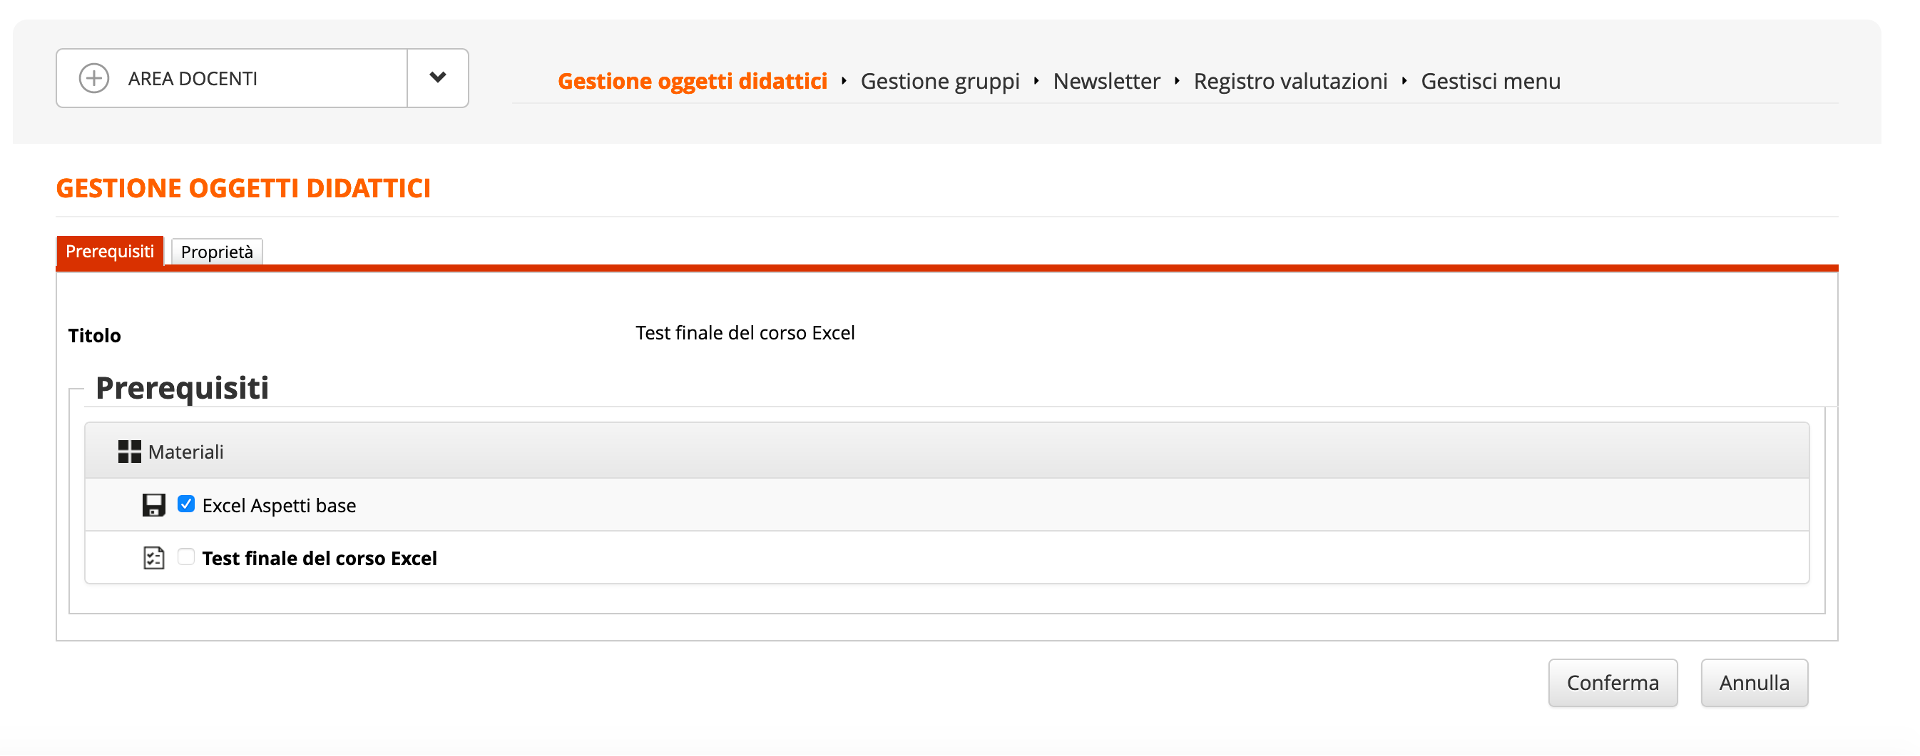
Clicking on the "properties" icon displays two tabs: Prerequisites and Properties. Let's start by seeing what you can do by clicking the "Prerequisites" tab
One of the first options that is usually requested is the possibility of setting the sequencing between the learning objects. (Simply put, you are asked not to be able to access an object before completing the object that precedes it.) To set the sequencing, simply click on the wrench icon for each learning object. Following our example, we want to complete the Excel basic aspects file before we can access the final test. We will then click on the "wrench" relating to the final test

At this point, we just have to put the check in the learning object that must be completed in order to access the final test. In our example, we will then put the check on "Excel Basic aspects"
By clicking on the "Properties" tab we can set other configurations.
Once the configurations have been set, remember to click on the "Confirm" button

To view the description of the remaining icons, please view the other tutorial How to configure the Learning materials .
The Forma Lms project is driven by the community of its adopters, organized in the forma.association
Become a member to support the project and make your opinion count: join the association now!
Knowledge, through learning, today is probably the most critical asset for any company willing to stay competitive and alive. Modern organizations need adaptive models to face the challenges of their markets: that's why whe choose to be open to evolving diversity since our core code with an open source licencing model, and based the forma.association on the principes of participation, sharing and networking.

A learning management system designed to fit the specific needs of your organization: start with all the features of a standard LMS, configure it with hundreds of available options, integrate with your other systems through connectors and APIs, extend with lots of available plugins, or add your custom features.
Forget the limits of saas platform and get free: here EVERYTHING IS POSSIBLE!

Some of the cookies we use are essential for parts of the site to operate and have already been set. We also use Google Analytics scripts, which all use cookies. You may delete or block all cookies from this site in your browser options.